The Provident Homemaker
  • Recipes and Info
    • Making Bread
  • My Blog
  • Favorite Resources
  • Documents and Files
  • 52 Weeks of Building Storage

Week 18- Make Your Own Cream of Tomato Soup

8/10/2019

0 Comments

 
Your weekly assignment- you have two this time!  B4-3, and do a quick inventory of nonfoods. These include toilet paper, shampoo, soap, dish soap, laundry soap, hygiene supplies. Record what nonfoods are open; note how much is in each. At the end of four weeks, go through them again.  Note how much of each you used; multiply by three to know what you need for 3 months’ supply, or by 12 to know for a year supply. (Purchasing these begins in one month.)

Tomatoes are in full production mode in my garden right n
ow.  I made a couple dozen jars of salsa this week, and picked tomatoes again this morning.  About half of them went into a giant, double-size lasagne for my son's birthday dinner, but there are a couple quarts of cherry tomatoes left over.  I'm debating whether to make a cherry tomato salad tomorrow (yes, it's the right link; scroll down), or this cream of tomato soup. 
It's simple and delicious. Using cherry tomatoes increases the natural sweetness; did you know that commercial versions almost always add sugar to their tomato soup?  

Another advantage to making it yourself is you can substitute out any ingredient you have food sensitivities to.  Can't have dairy?  Use a nondairy milk instead, or coconut cream for a richer version.  Can't have wheat or gluten?  Use cornstarch to thicken it instead of the flour. (You'll only need half as much, and don't add it to the hot vegetables; add it to the blender along with the broth and tomatoes.)


The biscuit recipe is a fast drop biscuit version- the butter is melted before mixing in, rather than cut in. In the photo below, the biscuits were made with cheddar cheese and crumbled bacon in the dough. ​Mmm.

BTW, the link to the cherry tomato salad has two tomato recipes- a surprisingly hearty tomato salad, and the most delicious vegetable gratin I've ever tried.  (Bonus- it uses tomatoes AND the extra zucchini or summer squash that seems to always hide under the leaves until it's big! 
Picture
0 Comments

Week 16, Anything-Goes Muffin recipe

7/27/2019

0 Comments

 
Picture
Your week 16 assignment:  Buy for Three.

Two houses, four wards, and almost ten years ago, a friend and I were on a quest to find two things--
the perfect pancake recipe,
and a perfectly adaptable muffin recipe. 

We measured, stirred, cooked, talked, shared and compared.  (I still think the ‘Foolproof Pancake’ recipe is tops.)  And after all that, Laura compiled what I learned about muffins with what she learned about muffins, and the “Anything Goes” Muffin recipe is the result. 

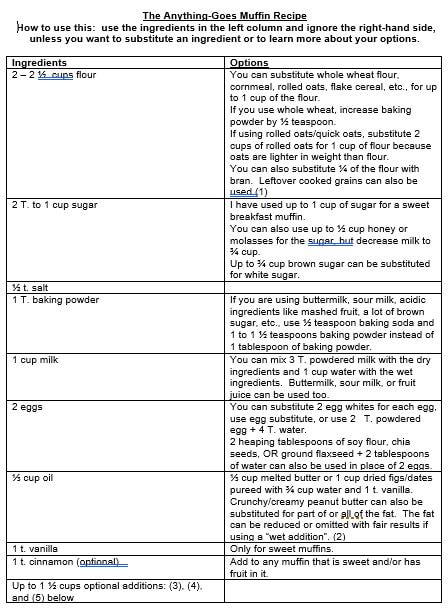
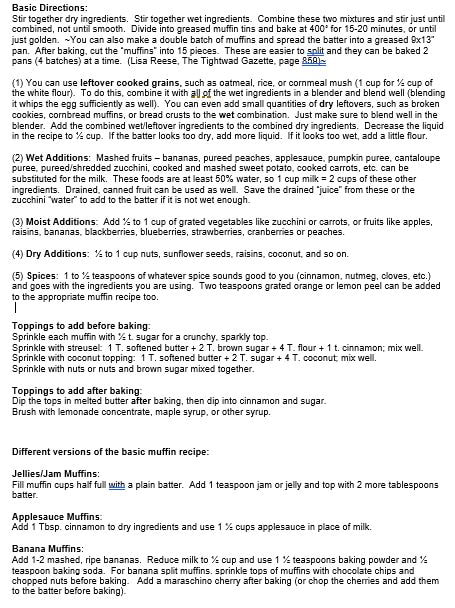
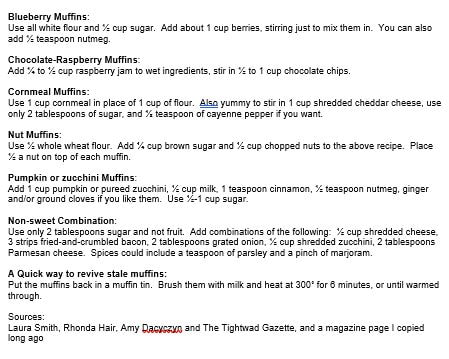
It’s a basic recipe that you can customize- whether sweet or savory, it will make good muffins.  Lemon-blueberry, bacon-cheese mufins, spiced applesauce muffins, oatmeal cinnamon muffins, chocolate raspberry or chocolate banana muffins, and much more.  Do you have a couple overripe bananas sitting on your counter?  This will help you use them up. How about a wrinkly apple that has gone mealy?  It will be delicious chopped or shredded into muffins.
After you've used this recipe-- or formula-- a few times, you'll get to where you don't even need the recipe to make any kind of muffin you can think of.

What will you make with this recipe? 

Or, what did you make?

Picture
Picture
Picture
0 Comments

Lemon-Summer-Squash Bread

8/1/2013

0 Comments

 
Picture
Everyone knows you can make bread with zucchini- but what if you have a giant yellow summer squash hiding in the garden?

Both zucchini and yellow squash-- either straightneck or crookneck-- are summer squash, with a similar flavor and texture, and CAN be interchanged in recipes.

My family's favorite quickbread is Lemon Zucchini Bread- so today we got Lemon-SummerSquash Bread.  I no longer shred zucchini -or this squash- for recipes, but puree it instead.  No more strings.  As a bonus, if I'm freezing some for later use, the texture does not change when thawed, unlike shredded squash.  

AND, if you're pureeing it, you can have the blender (or food processor) mix all the wet ingredients for you.

This bread is great for breakfast.

The recipe is found over here, though the blender method is below. 
0 Comments

Bisquick Substitute

7/17/2012

1 Comment

 
I recently answered a question about how someone could make a Bisquick recipe when he didn't actually have any of the baking mix.  You can make your own mix to have on hand, but that's not necessary either.  Here's one way you can do it. 

Find your favorite Bisquick recipe (one is below), but make your own substitute.  Bisquick is simply a mixture of flour, leavening, shortening/fat, and salt.

The following recipe calls for 2 cups of Bisquick.  To get 2 cups of substitute, do this:

Pull out a one-cup measuring cup. Put in the bottom of it: 2 tsp. baking powder, 1/2 tsp. baking soda, 1/2 tsp. salt, and 1/4 cup shortening, coconut oil, or softened butter. Fill the cup the rest of the way with flour, and level off.  Dump this into your mixing bowl and mash with a fork until the butter/shortening is mixed in. Add one more cup of flour. This is your "Bisquick".  Proceed with the rest of the recipe.   You can find a ton of recipes at the Bisquick site.


7-Up Biscuits (especially tender and light)

◦3 Tbsp butter, cut in 3-4 pieces
◦2 cups Bisquick
◦1/2 cup sour cream
◦1/2 cup 7-Up or other lemon lime soda

Preheat the oven to 450 F.   Put the butter in a 9x9 pan and put it in the oven to melt.  Meanwhile, put the Bisquick (or your substitute ! ) in a bowl and stir the sour cream into it.  Stir in the 7-Up.  This dough is soft.   Pull the melted butter out of the oven.   Sprinkle some flour on the counter, dump the dough out on top of it, and sprinkle the dough with a little bit of flour.  Pat it about 1/2" thick.  Cut with a biscuit cutter, a canning jar ring, or the mouth of a drinking glass.  (You can pat it into a square, and cut 9 even squares out of it, instead.)  Put the biscuits in the pan, on top of the melted butter, and baked about 10 minutes, until golden brown.

This recipe came earlier from 
http://realmomkitchen.com/8665/7-up-bisc…
1 Comment

Gluten-free Pizza Crust

7/10/2012

0 Comments

 
Picture
Do you need a quick pizza crust?  This one doesn't require any rising time, which means you could have a fresh-baked pizza in less time than it takes to order out!

You may like this even if you don't have to avoid wheat or gluten.  If you don't these flours and gluten's OK for you,  the recipe can be modified back to a wheat-based crust; just use a total of 2 cups flour.

Gluten-free pizza crust

1 cup brown rice flour
1/2 cup potato starch
1/2 cup tapioca flour/starch (or adjust these 3 ingredients to total 2 cups)
1 Tbsp. baking powder
1/2 tsp. salt
1 Tbsp. sugar
3/4 to 1 cup water or milk, just off boiling (very hot!)

Preheat your oven to 400 degrees F, grease a pizza pan or baking sheet.
Stir together flours/starches, baking powder, salt, and sugar. Stir in the hot water or milk and stir until it forms a dough. Pat about 1/4" thick onto the pan you're using.  Bake until just set, about 10-15 minutes, depending on thickness. Add your sauce and toppings and return the pizza to the oven until cheese is melted. (I like to put it under the broiler for 2 minutes instead, to get browned & bubbling bits on the cheese.)
0 Comments

Baking Powder and Baking Soda

6/26/2012

0 Comments

 
Picture
Do you know the difference between baking soda and baking powder?  

How long have they been around?


Baking soda, sodium bicarbonate is an alkaline powder; when it is mixed with acidic ingredients, the two react and form carbon dioxide bubbles.  The bubbles lift and lighten batter as it bakes; baking must be done right away, before the bubbles dissipate and you lose its leavening power.  Common acidic ingredients include vinegar, buttermilk, sour cream, lemon juice, cream of tartar, brown sugar, and honey.  Baking soda also helps foods brown better, since moderate alkalinity, along with heat,  is a catalyst for the Maillard Reaction (the reason, other than caramelization, that cooked foods turn brown).

Baking powder is a combination of alkaline, acid (cream of tartar), and starch.  You don't need to use acidic ingredients in recipes using just baking powder, since the balance is already there.  Most baking powders are made with two different alkaline powders- one that reacts right away (baking soda), and one that reacts only with heat.  This way you can save some of that leavening power for when the food is actually IN the oven.  The starch is there to help absorb moisture so the powders don't react in the can and to help the powder stay free-flowing.

To use baking soda instead of baking powder, use 1/3 the amount, and make sure there's something acidic in the batter.  For instance, if your recipe calls for 1 Tbsp (which is 3 tsp.) baking powder, you can use 1 tsp. baking soda, and use buttermilk- or sour milk-  instead of regular milk.  Or mix in 1 tsp. cream of tartar.  Or use brown sugar instead of white.  

This works in reverse, too: if your biscuit recipe calls for buttermilk and you only have plain milk, use it but switch that 1 tsp. baking soda for 1 Tbsp. baking powder (or whatever it calls for, keeping that 1:3 ratio).

As far as I can find, baking powder wasn't invented until the 1800's, but leavening powders have been around at least for centuries.  Some of the earlier ones include:

Baker's Ammonia (ammonium carbonate, "hartshorn"; NOT cleaning ammonia!- which is poisonous)- made from powdered reindeer horn.  (Seriously.)  This one actually has characteristics more of baking powder, substitutes 1:1 for it, and makes cookies especially crisp and light.

Potash or pearl ash (potassium carbonate, an alkaline salt)- made by adding water to  the ashes of 'vegetables' or weeds, steeping overnight, then evaporating all the water by boiling.  The fine 'ash' left is used as baking soda.  There's a fascinating article on the process in the 1802 "Domestic Encyclopedia"

Saleratus, or soda ash (sodium carbonate, an alkaline salt)- also known as washing soda... sometimes used also in the boiling water step of making bagels, as it helps them brown better (Maillard reaction!!!).  An interesting bit of chemistry with this one is that when you heat  sodium bicarbonate (baking soda) by itself above about 160 F, you end up with sodium carbonate (washing soda), with byproducts of carbon dioxide and water (which dissipate into the air).  2NaHCO3(sodium bicarbonate) → Na2CO3(sodium carbonate)+ H2O + CO2  (It works fastest at 400 F.)

Baking soda's first large-scale appearance was in 1846, when a factory was built to make this new product, created by doing the opposite of the formula above- dissolving sodium carbonate in water, then pumping in carbon dioxide.  (There's a more efficient method now.)

  Can you believe we've had this useful leavener less than 200 years, and baking powder less than 150?     Boy, are we spoiled in the kitchen nowadays...


Read more:
http://www.foodsubs.com/Leaven.html
http://en.wikipedia.org/wiki/Saleratus
http://en.wikipedia.org/wiki/Washing_soda
http://chestofbooks.com/reference/The-Domestic-Encyclopaedia-Vol3/Pearl-Ash.html
0 Comments

Baking with Whole Wheat Flour

5/26/2012

0 Comments

 
Picture
If you're new to cooking with whole wheat, I recommend you also read Wheat Basics.


If you’re using whole-wheat flour instead of all-purpose flour, there are a couple things to know for successful baking.  Whole grains contain fiber-rich bran and nutrient-rich germ, as well as the starchy endosperm.  Processed white flour contains only the starchy part, not the bran or germ.  Because of this, you'll need to adjust your ingredients a little bit, either reduce the amount of flour by 2-3 Tbsp. per cup used, OR increase liquid by 3-4 Tbsp. per cup used and increase leavening by about 1/3.   Otherwise, your baked goods will be more dense, heavy, and flat than they need to be.   See more on this below.

Bran
is the outer protective layer of the kernel, it's very high in fiber and minerals, and vitamins.  That fiber  is very absorbent.  Because of this, whole wheat flour (measured by weight) absorbs about 25% more liquid than processed white flour does.   Bran also makes it harder for gluten to form; its sharp edges tend to cut the tiny gluten strands.  Soaking the dough – mixing at least the flour and liquid, then letting it sit for a few hours or overnight - softens the bran.  That’s one reason European breads have long rise times. The technique works well for pancake batter and cake batter- leave eggs out of the batter until ready to bake, or soak covered in the refrigerator.

The germ is also high in vitamins and minerals, as well as protein, some fiber and fat (vitamin E).   Its name comes from the same Latin root as the word "germinate"; germen , which means to sprout or shoot.   The germ is the part of the grain that can grow into a plant.  It is dense and heavy, and therefore you'll need more leavening in the recipe.  The vitamin E, which is an oil, is the reason for whole wheat flour's short shelf life; this type of fat oxidizes quickly, which makes it slightly rancid.  Store fresh-ground flour in the fridge or freezer to prolong its life and vitamin content.  If you leave the flour at room temperature, it's at its best within 24 hours, but is still good (though less nutritious) for about a week.  It won't make you sick after that, just won't give you all the benefits it would have when more fresh.  Neither does it taste as good.  That's why bread made from freshly ground flour tastes so much better than bread made with whole wheat flour from a bag at the store.

To recap:  
either use about 20% less flour (2-3 Tbsp. less per cup used),
or increase water by about 3-4 Tbsp. per cup of liquid and add about 1/3 more of any leavening agent you’re using (1 tsp. more per Tbsp).  

Fresh-ground flour is fluffy and less packed in the cup, so there’s already less there.  For the most accurate measuring, go by weight, not volume.
0 Comments

Crepes and Blueberry Sauce

1/14/2012

0 Comments

 
Picture
Once you learn the whole rotating-the-pan trick, crepes are EASY.  It's actually the same batter as for German Pancakes.  How's that for a two-for-one?

I recommend making the blueberry sauce the night before, or not trying to make it until after the crepes are done.  You'll need your full attention on the crepe pans.

Crepes
3 eggs
1 c. milk
1 c. flour
butter or oil for the pan
Makes about 10-12 crepes, depending on size and thickness.

Put one or two skillets (6" or larger) on the stove; heat over high heat.  I always use two at a time for this.   Nonstick skillets are easiest to work with, since they are lightweight, and will require less-  or no-  butter.  While they're heating, make the batter:

Bowl method: Beat the eggs with half the milk, stir in all  the flour.  Beat in remaining milk, until mostly smooth. 

Blender or food processor method:  add eggs, all of the milk, and all the flour.  Process until smooth.
Cook the crepes (see below).  Leftovers may be stored in a bag or airtight container in the refrigerator for up to a week, or in the freezer for months (as long as they don't get freezerburn).

Blueberry Sauce

1 Tbsp. cornstarch OR 2 Tbsp. flour
1/2 c. sugar or honey
1/4 c. water
2 c. fresh or frozen blueberries, divided
a pinch of salt
1-2 drops lemon or orange oil OR 1/8 tsp. lemon extract, OR 1 Tbsp. lemon juice, optional

In a microwaveable bowl or a small saucepan, stir together the cornstarch/flour and sugar or honey. Stir in the water and half of the blueberries.  Bring to a boil, stirring often if you’re using the stove.  Once it boils and thickens, stir again, then mix in the remaining berries.  Makes about two cups.  Serve warm or cold.  If it's not sweet enough for you, add 1Tbsp. sugar, taste it, and repeat as needed.  If you want it thicker next time, double the cornstarch.  

Keep any leftover covered tightly in the refrigerator.  Leftovers can be thinned with water to make a pancake syrup, added to smoothies, stirred into plain yogurt to sweeten it, used as a topping for cake or cheesecake, as a filling for tarts or pies, or stirred in to muffin batter.

Picture
Add a teaspoon of oil to the pan, or a tablespoon if it's nonstick.  Pick up a skillet with one hand, tip it to one side, and pour about 2-4 tablespoons of batter into the hot pan.  Quickly rotate your wrist to make the batter spread in a thin layer completely around the pan.  Put it back on the stove (and pour batter into the second pan, if you're using it). 

Picture
When the edges curl up a little and/or turn brown, work a spatula underneath the crepe and flip it to the other side.  This first side should take 30-60 seconds to cook. 

Picture
The second side is even faster; once it's completely set, with just a few golden spots, slide or flip it out of the pan onto a waiting plate.  (see next photo)

You don't need to add butter to the pan every time, only if the crepes start sticking.


Picture
When all the batter has been cooked, cover with a clean kitchen towel to keep warm.

Picture
You can fill crepes with a thin layer of something strong (like jam, lemon curd, or cream cheese), or with about 1/4" cup of any filling. 
Some ideas:
-Bananas (sliced, whole, cooked, or raw) with a little brown sugar or caramel
-Apples, sauteed or microwaved until soft- add brown sugar and cinnamon to taste
-Pie filling- blueberry, apple, cherry, apricot, or whatever else
-Pudding
For savory crepes, use the crepes are manicotti shells, tortillas, or egg roll wrappers.  Fill with anything you'd put in those.  Or make a sandwich wrap with them.


0 Comments

Cooking with essential oils

1/6/2012

9 Comments

 
Picture
Pumpkin-Orange Muffins- made using essential oils!

Recipe is at the bottom of this page.

My friend's sister sells essential oils, and has had a lot of people ask how much to use if they want to cook with them.  She asked if I would play around with the oils if she provided them,  and come up with some guidelines and recipes.  Here's the start of that.  As I add more recipes, I'll add them to an indexed pdf so they're easy to access.   (More on that another time.)

First of all, please make sure that you're using pure oils that don't have any chemical residues or other nasty things.  In other words, use Grade A/Therapeutic Grade oils, or Grade B/Food Grade oils.    The label should tell you what grade it is.  There are four grades, see here for more on this.  Several sources say not to ever ingest essential oils, see more about why I disagree with thathere.

Second of all, realize this is not going to be an exact science.  Several things will affect how much oil to use in a recipe:
-What brand you use- some are better quality than others
-How old the oil is (they lose potency over time; these are strongest when under a year old)
-What the growing season was like that year for the plants
-How big your bottle is- see below for an explanation
-And how strong of a flavor YOU prefer!

I've discovered that your bottle size makes a huge difference on the size of the drops that come out.  The 15mL bottles I have require only 16 drops of oil to equal 1/8 teaspoon.  The dram-sized bottles (the kind with a stopper and a little hole in the middle of it) give out teeny-tiny drops- it takes about 64 of these drops to fill 1/8 teaspoon!  (Yes, I did crazy things like measure all of this....) If you're going to cook with your oils, I actually recommend putting your cooking-herb oils in this smaller size; so little is needed that the smaller drops are perfect.  Oils in this category would include oregano, thyme, coriander, rosemary, lavender, and marjoram.  To get a drop out, tip the bottle over the food you're adding it to, and gently rap the bottom of the bottle once.  Watch closely; it's hard to see when it comes out.  A little goes a LONG way!  The oils I've been using are from doTERRA. 
Below are the general guidelines I've learned.

When your recipe calls for herbs:
1/2 tsp. dried herb leaves =  1 1/2 tsp. (1/2 Tbsp.) fresh herb = 1/4 tsp. powdered herb = 1 tiny drop essential oil
1/2 tsp. powdered herb leaves = 1 tsp. dried herb leaves = 1 Tbsp. fresh herbs= 2 tiny drops essential oil
1 tsp. powdered herb = 2 tsp. dried herb leaves = 2 Tbsp. fresh herbs = 2 tiny drops, or 1 regular-sized drop

Using citrus oils:
1 tsp. lemon extract = 1/8 tsp. lemon essential oil = 16 drops
1 Tbsp. lemon zest = 1/16 tsp. lemon essential oil = 8 drops

So if your favorite spaghetti recipe calls for 2 tsp. powdered oregano, you can use one regular-sized drop of essential oil instead, or 4 tiny drops.

The herb ratios also seem to hold true for spices like cinnamon and ginger.  I especially love the flavor of cinnamon oil- it's a pure, clean flavor reminiscent of red hots.  I put two tiny drops in a half-pint of cream, along with 2 Tbsp. sugar and a bit of vanilla,  before whipping it-  Cinnamon Whipped Cream- delicious!  We had it on pumpkin pie, for breakfast.   The pumpkin pie itself also used essential oils for its spices.

Picture
Pan-Fried Fish

For 1 lb. boneless fish (I used tilapia):
Cut the fish into serving-sized chunks.  if there are any thin ends, tuck them under.  Pat dry with a paper towel, prinkle lightly with salt and pepper.

Breading: Combine on a plate:
2/3 c. flour, breadcrumbs, cornmeal, crushed potato chips, potato flakes, or whatever!  (I used 1/3 c. each flour and cornmeal)
1/2 tsp. salt
1/4 tsp. pepper

Dipping mixture: combine in a wide dish:
1 egg, beaten
2 Tbsp. buttermilk, yogurt, or mayonnaise
1 Tbsp. mustard (either Dijon or regular is great)
1/4 tsp. garlic powder, or 1 tiny drop garlic essential oil
1/8 tsp. cayenne pepper
1/2 tsp. thyme, or 2 tiny drops thyme oil- I used rosemary instead
4 regular drops any citrus oil, optional (lemon, lime, orange, or grapefruit)

Heat a 12" skillet over medium-high heat.  Add oil; at least 2 Tbsp. or up to 1/2 " deep, depending on how "fried" you want this.  While it's heating, drop a piece of fish into the dipping mixture; turn to coat.  Lift out, then put it in the breading.  Flip it over with a fork to coat it, then put it in the hot oil.  Repeat with other pieces until the pan is fairly full, but pieces are not crowded or touching.  Fry 2-4 minutes, until bottom is dark golden brown.  Flip, and cook other side until the thickest piece is opaque inside and starts to flake when poked open.  Serve hot, with tartar sauce or lemon wedges.

I always have leftover breading and dipping mixture.  Instead of throwing it out, I turn it into Hushpuppies:  To however much breading is left, add that much fresh flour (breading is very salty!) If you now have a cup of this dry mixture, add 1 1/2 tsp. baking powder.  If you have less or more flour/breading, use less or more baking powder!  Add whatever dipping mixture is left.  Add water if you need, to be able to get a soft dough that more or less holds its shape.  Drop by spoonfuls into the hot oil.  Fry until golden ( a couple minutes), turning them over once.


Pumpkin-Orange Muffins- makes 12
2 c. flour (I used whole wheat)
1/2 tsp. baking soda
1 1/2 tsp. baking powder
1/2 tsp. salt
1 tsp. cinnamon, or 1 regular-sized drop cinnamon essential oil
3/4 c. sugar (or 1/2 c. honey)
1 c. buttermilk or sour milk
8-16 drops orange essential oil (1/16 to 1/8 tsp.)- this is distinctly orange-flavored!
1 c. pumpkin puree
1 beaten egg
1/4 c. oil or melted butter
1/2 c. chopped pecans, optional

Preheat oven to 375 degrees.  Grease 12 muffin cups, or line them with cupcake papers.  Mix together the dry ingredients: flour, baking soda, baking powder, salt, cinnamon, and sugar.  Add the wet ingredients all at once: buttermilk, orange oil, pumpkin, egg, and oil.  Stir just until combined.  Spoon into muffin tins, then sprinkle with the nuts.  Bake about 16-18 minutes, or until lightly golden and the top of a muffin springs back when touched. 

9 Comments

Cream of Tomato Soup and Cheesy Biscuits

10/7/2011

0 Comments

 
Picture
What better meal for a chilly, rainy, end-of-the-garden kind of day?

Picture warm, smooth, bright-flavored cream of tomato soup; tender, flavorful bacon and cheese biscuits with a crispy exterior.

The recipes are simple, and definitely beat store-bought for flavor and aroma!  I'll be teaching a class on this, with variations, next week (see Classes), and the recipes and variations come from my cookbook, The Chameleon Cook.

Cream of Tomato Soup
1 Tbsp. butter
1/2 medium onion
1/2 one carrot
1/2 one celery stalk
1-2 Tbsp. flour
1 lb. fresh, or 14 oz. can stewed, tomatoes
2 sprigs fresh parsley, 1 Tbsp. fresh basil, or 1 tsp. dried basil
1 c. chicken broth, or 1 c. water and 1 bouillon cube
1 c. evaporated milk, half-and-half, or cream
salt and pepper to taste

Cheesy Biscuits
1 cube butter, melted and cooled
2 c. flour
2 tsp. baking powder
1/2 tsp. baking soda
1/2 tsp. salt
1 tsp. sugar
1 cup cold buttermilk or sour milk
1/2 -1 cup shredded cheese
2 slices bacon, crumbled (optional)

Picture
If you're making both, start by turning on your oven to 475 degrees Fahrenheit. 

Chop half a medium onion, half a carrot (or 3-4 baby carrots), and half of one celery stalk. Cook over medium-high heat with 1 tablespoon butter or oil.  Stir once in a while, until the vegetables are tender, about ten minutes (depending on the

Picture
While the vegetables are cooking, start the biscuits.  Melt one stick of butter; set it aside to cool.  In a medium-sized mixing bowl, combine 2 cups flour, 2 tsp. baking powder, 1/2 tsp. baking soda, 1/2 tsp. salt, and 1 tsp. sugar. 

Stir one cup of very cold (right out of the fridge) buttermilk or sour milk into the butter.  As you stir, the butter should start to form clumps.  This is good; it gives you the same effect as "cutting in" the butter with the flour, but much quicker.   Pour all but about a tablespoon of it into the flour mixture, add 1/2 to 1 cup shredded cheese (the milder the cheese, the more you need), and a couple tablespoons cooked & crumbled bacon (optional).  If you like, you can also add 1/8 tsp. cayenne pepper and/or 1/2 tsp. mustard to accent the cheese flavor.  Stir just until combined.

Picture
Put big spoonfuls on an ungreased cookie sheet.  If you want a more structured biscuit shape, use a greased 1/4 c. measuring cup as a scoop. 

Dip a pastry brush into that last little bit of milk/butter; dab some on the tops of all the biscuits.  Put them into the oven to bake, then check on your vegetables.  These will take about 12-14 minutes to cook- you want the tops crusty golden, and the insides just set.

Picture
When the vegetables are tender, add 1-2 tablespoons of flour depending on how thick you want your soup. Cook and stir for one minute, to brown the flour a little. 

Picture
Put 1 pound of fresh tomatoes (or use one 14-oz. can of stewed tomatoes) in the blender or food processor.  Add the vegetables, one cup of chicken broth (or water and bouillon), and blend until smooth. 

Picture
Pour back into the saucepan.  To catch any little lumps or bits of tomato skin, set a fine-mesh sieve over the pan as you pour. (optional)  Add a couple sprigs of fresh parsley, a tablespoon of fresh basil, or a tespoon of dried basil.  Simmer for 10-20 minutes, to blend the flavors.

Picture
Stir in one cup of half-and-half, cream, or evaporated milk.  Add salt and pepper to taste; about 1/2 tsp. salt and 1/4 tsp. pepper. 
Serve hot, with those biscuits to dunk in it!

Now let that wind blow and rain patter against the windows!

0 Comments

Cookbook- Miscellaneous, Pies, Quick Breads 1

4/4/2011

0 Comments

 
Picture
Different pies and piecrusts.  The card only covers cream pie varieties, but has a few different crusts.

Picture
Did you want to see closer?

This one is chocolate-peanut butter cream pie.

Picture
Apple Cider Syrup is YUMMY.  We use the recipe to make many flavors.  Our latest favorite is made using mango juice.

Picture
Crunchy on the outside, velvety on the inside, simple Drop Biscuits.  The batch pictured uses about half whole-wheat flour.

Picture
Craggy, crisp, and hearty- use the Drop Biscuit recipe to make Drop Scones.  Here, I swapped some oats for some of the flour, and stirred in chopped figs and toasted nuts.

Miscellaneous card 1 apple cider syrup, basic syrup, easy jam, cooking grains, 5-min marmalade

Miscellaneous card 2 granola, granola bars, home remedies, seasoned salt, seasoned flour, spice chart 

Pies  cream pie filling, shortbread crust, meringue, crumb crust, pat-in-pan crust, traditional crust

Quick Breads card 1  drop biscuits, English scones, biscuit mix, soft breadsticks, rolled biscuits, shortcake, biscuit dough ideas

0 Comments

Gardening 101, Flour Tortillas, Gluten-free Tortillas

3/25/2011

0 Comments

 
Picture
Oregano volunteer between flagstones.  The garden started itself, hooray!  This baby plant needs moved since it will get tall.

Are you itching to grow a garden this year?  Whether you're planning big, or starting small, here's some great information.  When you buy seeds, keep any you don't use.  They will be good next year if you take good care of them- cool, dry, and  dark.  They will last at least a few years if you store them properly.   I usually get a good four or five years out of my packets.   After that, not as many of the seeds germinate.  Edibles look good in your flower beds!  Planting a few of those in existing beds is an easy way to get started.
For more information, click on this link, 
Gardening 101.
It includes:
​-
choosing a garden spot
-preparing your soil
-fertilizing
-choosing seeds
-saving seeds you grow
-when to plant them
-helpful links
-an area-specific freeze chart for SLC, Utah (USDA Zone 5)


See Gardening On A Dime for some cheap ways to help you garden.
To get a chart showing what you can do each month in your garden, see the USU Extension  month-by-month garden guide.

Happy gardening!
-Rhonda
______________________
Flour Tortillas- makes 12
3 c. all-purpose flour
2 tsp. baking powder
3/4 tsp. salt
about 1 cup warm water

The simple instructions:  mix dry ingredients, add water and knead til smooth.  Form 12 balls, let rest covered, flatten with hands, roll thin, and cook in a hot pan, flipping once.  Cover with a kitchen towel.

If you want more details:   Stir together flour, baking powder, and salt.  Gradually stir in the water, then mix with your hands until it holds together.  If it's very tough, add another teaspoon or two of water.  If too sticky, add a little flour.  Knead until smooth.  Divide into 12 balls.  Cover with plastic wrap or a damp cloth and let rest 10-15 minutes to let the gluten relax.  Flatten a ball with your hands until it's about 4 inches across, then roll with a rolling pin, working from center out, until very thin and about 9 inches across.  It helps to use very little flour on the counter and a little more on the top of the tortilla so the rolling pin doesn't stick.  Cook over med-hi heat in an ungreased skillet.   When top is covered in blisters, flip it over and cook until the other side bubbles up too.  The blisters should be golden brown. Each side should take a minute or less.  When each tortilla is done, put it in a plastic bag or on a plate; cover with a towel to keep them warm and moist. 

If you're saving them for the next day, they stay soft but not soggy in a plastic bag with a paper napkin inside to absorb the excess moisture.

To make tortilla chips, cut into triangles and deep fry, or spray with Pam and bake at 375 degrees for about 7-10 minutes, until crisp.

Make tortilla bowls by either baking or frying, too.  Baking- drape over an upside-down ovensafe bowl, spray or brush lightly with oil, bake until golden.  Frying- make a few holes around the bottom of an empty 10-oz soup can, heat oil 2" deep to 375 degrees, put a tortilla on the hot oil, and immediately press down on it with the soup can.   Cook about 30 seconds or until crisp.  Lift out, draining off extra oil.  Set on paper towels.  

Simple Gluten-Free Tortillas-makes 8
2 cups oat flour (I use whole oat grouts, and grind them into flour with my wheat mill. You can also use rolled oats and grind them in a blender)
1/4 teaspoon salt
1/2-3/4 cup warm water (using warm or hot water allows the oats to act 'glutinous', no xantham gum needed.)

Mix dry ingredients. Add water slowly and mix evenly with a fork til moistened. Gather dough into a ball, adding more water if needed. For pliable tortillas, I've found it's important for the balls to be moist(not sticky once kneaded, though). Knead well. Split into 8 sections, then form balls with each section. Cover for 10 min. You may want to cover with moist towel to keep them moist.

Shape into tortillas 7 - 8 inches diameter. Cook on hot griddle or medium-high heat frying pan(heat these first), for 1 -2 min per side. Stack on plate and cover with a dish towel. Serve warm. These will toughen quickly when reheated.

The basic recipe can also be rolled out and baked for crackers.  For more details on that, go to 
http://wheatdairyeggnutfree.blogspot.com/search/label/Tortillas%20and%20Crackers 


0 Comments

How to eat well and still spend less; Quick & Cheap Meals

2/3/2011

0 Comments

 
Picture
photo courtesy of photos8.com

Hi everyone,

Does it always seem like too much of your budget goes to food?  Do you wonder what amount of money is 'normal'?  If so, go to the Official USDA Food Plans pdf.

This page will give you the 2010 averages, based on nutritionally balanced diets cooked at home.  Now that you see how frugal you really are, here are some tips to help even more; pick just one or two to try so it's not overwhelming. Then all that's left is deciding how that new-found money is going to better use!

Ways to eat well on less money:

*Buy on sale and get extras so you never pay full price.

*Buy the fresh fruits/veggies that are $1/lb or less.

*Find ways to throw away less- only serve up what you will eat, save wilted veggies in the freezer for soup later, re-purpose leftovers.

*Use meat mostly as a flavoring (mixed in with other ingredients), not as its own dish.

*Buy meats that you can get for $2/lb or less, or whatever is bargain-price for your area.

*When you buy meat, get a bunch on sale, then cook it all at once.  Package and freeze most of it for future, faster, meals.

*Buy flour, sugar in bulk, make more things from scratch.

*Keep your kitchen clean so you like being there!  (You don't need to do it all yourself!  Doing dishes 'all the time' causes depression for me- once I added that to my kids' job charts, I felt much better!)

*Grow a garden where you used to have some lawn- you get the same water bill, more food.  Packets of seeds can last 4-5 years if kept cool and dark.   Or split packets with a friend.  

*Make your own bread instead of buying it.

How much can you save on bread?  Cost varies by recipe, but mine comes out to less than $ .50 per loaf ($. 42), including the electricity for baking, for top-quality whole-wheat bread.  (Well, frankly, the quality varies by week....)   If you eat two loaves a week, that saves you $200/year when compared to $2.50/loaf of bread.   We go through 6 loaves a week, so we’re saving over $600 per year.  Yes, a stand mixer and grain mill  definitely pay for themselves!  For the recipe I use, see Basic Bread on my website.
 
Yesterday the Teachers' Quorum (14-15 yr. old boys) came to my house for their weekly activity.  They've been learning about nutrition and safe food handling, so they all pitched in and cooked a meal.    Their handout included budget-friendly, adaptable, and fairly fast recipes; the kind that would be especially valuable when in college or on missions.  For these recipes, click on Quick & Cheap Meals.  The boys did great with them, I think you'll like them, too.   

Happy cooking and budgeting!
0 Comments

The Celestial Nature of Self-Reliance, Lemon-Zucchini Bread

10/28/2010

0 Comments

 
Picture
(originally from 8/5/10)
Do you have garden produce yet?  Or are you seeing it at farmers' markets?  We got the first yellow summer squash of the year yesterday.  This is exciting!  Unfortunately, we don’t have zucchini at all because one of my little people stepped on the plants just as they were coming up.  I replanted, but didn’t water well enough that first week…


Fortunately, I still have frozen zucchini from last year.  I used to shred it and freeze it in quart bags, which was the proper amount for a double batch of my zucchini bread, but didn’t like how it thawed.  It separated into water and strings of fiber.  That’s kind of baffling to cook with.  There’s a much better way-  puree it! Chop the zucchini into chunks small enough to fit down your blender, and buzz until smooth.  A bonus is that the texture of your baked goods will be smoother. 

Our favorite recipe to use it is Lemon Zucchini Bread.  It has a little more flavor if you use fresh lemons, but is still good using bottled lemon juice and dried lemon zest.  Or use your lemon-zest-sugar, (find it in the archives under 'homemade orange seasoning', in the Spices or Seasonings category, right. And FYI, Zucchini bread, since it’s a ‘quick bread’, is simply a variation on the muffin recipe.   To see for yourself, go look at the 'Anything-Goes' Muffin recipe.                                          

 *  *  *  *  * 
Now, for the thought of the week- a First Presidency message from 1984, reprinted in the Ensign last year as one of the ‘classics’- “The Celestial Nature of Self-Reliance”.  Or, ‘what does self-reliance have to do with eternal life’? Think about it: Is food/money/water storage a suggestion or a commandment?  This article has something for any of us to work on- whether you haven’t started, are a little ways into it, making a lot of progress, or have built up all your reserves.  I HIGHLY recommend re-reading the whole article, below is a condensed piece of it:

 “Since the beginning of time man has been counseled to earn his own way, thereby becoming self-reliant. It is easy to understand the reason the Lord places so much emphasis on this principle when we come to understand that it is tied very closely to freedom itself.

Now, I wish to speak of a very important truth: self-reliance is not the end, but a means to an end.

Doctrine and Covenants 29:34–35 tells us there is no such thing as a temporal commandment, that all commandments are spiritual. It also tells us that man is to be “an agent unto himself.” Man cannot be an agent unto himself if he is not self-reliant. Herein we see that independence and self-reliance are critical keys to our spiritual growth.  Whenever we get into a situation which threatens our self-reliance, we will find our freedom threatened as well.  If we increase our dependence, we will find an immediate decrease in our freedom to act.

The key to making self-reliance spiritual is in using the freedom to comply with God’s commandments.”

For the whole article, which I know can bless everyone’s life,  go to The Celestial Nature of Self-Reliance at lds.org.

If using fresh lemons for this recipe, you'll need two. 

Lemon-Zucchini Bread


1 lb. zucchini or other summer squash (4 c. loosely packed, or 2 cups pureed)
¼ c. lemon juice*
2 Tbsp. fresh lemon zest, OR ½ tsp. lemon extract, OR 1/8 tsp (16 drops)    lemon essential oil
2 c. sugar
½ c. oil
3 eggs
3 c. flour
1 Tbsp. baking powder
1 c. chopped walnuts, optional

Place lemon juice, zest, sugar, and oil in a bowl and beat.  Add eggs, one at a time, beating well after each.  Stir in flour and baking powder, then add zucchini and nuts.  Pour into two greased and floured 9x5 loaf pans.   Or use three 8x4 pans.  Bake at 375 degrees about 50 minutes (40 for 8x4 pans) or until a toothpick inserted near center comes out clean.  Let cool in pans for 10 minutes, then turn out onto a cooling rack. Wrap or bag when completely cool. The flavor is even better the next day.


See the blender-mixing-method here.  

 *An acceptable substitute for lemon juice in this recipe is 1/4 cup vinegar (apple cider vinegar is better but not necessary) and a little bit extra lemon zest, extract, or essential oil.

 
0 Comments

link to "Top 10 Reasons for not starting food storage"; Curried Zucchini Bisque

10/27/2010

0 Comments

 
 How about another zucchini recipe?  Any summer squash can be used in the recipe.  Since I don’t have zucchini this year, (the seedlings were stepped on...) I’ve been making my lemon-zucchini bread with yellow summer squash, too. “Bisque” usually means a thick, creamy soup thickened by pureeing it, instead of by adding flour.  We made some yesterday using an immature Hubbard squash (picked by an enthusiastic child…), and it was delicious. The recipe came from the Ukraine; my sister ate it- and loved it- there on her mission.   In the bisque, the curry powder is great, but you can also  try other spices you like-   using basil or ground coriander  to taste, or a half packet of ranch dressing mix powder (Remember dressing mix is salty, so leave out the salt in the recipe).  The soup really shines when served with “Best Drop Biscuits” (archived under Quick Breads) or homemade French bread; something with some crunch to contrast with the silkiness of the soup. 

Here’s a video on YouTube about food storage, a lady from Arizona… this segment is “top 10 reasons for not starting food storage”: here if the link didn't work.  The sound doesn't work really well, but it's still worth watching!   http://www.youtube.com/watch?v=HhGaTlwYs-s      I thought it was pretty funny, but it makes you think.  Just remember that when she says ‘year’s supply’, that you don’t worry about that part until you reach Step 4 from the All Is Safely Gathered In booklet on providentliving.org. How much you store, on that step, is up to you to study and pray about.  Here are the four:

1. Gradually build a small supply of food that is part of your normal, daily diet until it is sufficient for three months.

2. Store drinking water.

3. Establish a financial reserve by setting aside a little money each week, and gradually increase it to a reasonable amount.

 4. Once families have achieved the first three objectives, they are counseled to expand their efforts, as circumstances allow, into a supply of long-term basic foods such as grains, legumes, and other staples.

 Happy storing! 
-Rhonda

 
Curried Zucchini Bisque
2 Tbsp. butter
2-4 tsp. curry powder- or use other spices you like
1 medium onion, chopped
¼ tsp. black pepper
3 c. chicken broth, or 3 c. water and 1 ½ tsp. chicken bouillon
1 (7-8 oz.) potato, cut in ½” cubes
1-1 ½ lbs. zucchini, trimmed and cubed
½ tsp. salt
1 ½ c. cream or evaporated milk (12 oz. can)  or a 12-oz. can of coconut milk

            Combine butter, curry powder, onion, and pepper in a medium saucepan.  Cook, stirring, for 2-3 minutes on medium-high heat.  Add broth, potato, zucchini, and salt.  Simmer 20 minutes or until potato is tender.  Add cream and puree the soup until smooth.         Serve garnished with croutons if you like.  Cubed chicken is also good in this. 

 
0 Comments

Summer squash and pumpkin powder, Foolproof Pancakes

10/27/2010

4 Comments

 
Picture
I love these powders!  Left to right: tomato powder, pumpkin powder, yellow summer squash powder, dried crumbled greens to put in soups in the winter.  (These greens are pigweed leaves- one of the wild edible weeds in my yard.)

Picture
Hot, fresh pancakes are simple to make. 

What else can you do with all that summer squash you have?  Make it into leather!  Yes, I know your children won’t think that’s the best snack around, but it’s not for them.  At least not by itself.  Better yet, turn it into powder.

The idea behind this is that pureed squash can be added to soups and breads (as in Zucchini Bread), and it takes a LOT less storage space when it’s dried.  There are at least two ways to get dried pureed squash:

(1)  Puree it, pour it on food dehydrator sheets, dry, and roll up, and

(2)  Slice the squash (1/4” wide is good), dry it like that, then run it through your blender when it’s crispy-dry.   This vegetable powder takes up even less storage space than the leather, plus it reconstitutes faster. If you're doing this with pumpkin, steam it before slicing; it will dry quite a bit faster and not have that raw taste.

(3)  Store it in something fairly airtight, in a dark area.  Canning jars are great, especially if you seal them by using a new lid, the ring, and an oxygen packet. (see Dry Canning.)

Now, how do you use it in recipes?  And how much do you use?  Remember thinking in school that you’d NEVER use  math in ‘real life’?  Ha!  It’s incredibly useful in the kitchen, especially when you start doing your own thing.

Measure and write down the quantity you start with, then measure and write down what you end up with.  Write it on your storage container, trust me, you’ll forget otherwise.   For instance, I started with 2 ½ lbs of yellow squash, which is 5 cups of puree.  I ran it through the blender, poured it on my (SPRAYED) dehydrating sheets, and turned on the dehydrator until it was dry and curling up on the edges and thin spots.  My sheets can fit two cups of puree each, which is one pound, so each roll of ‘leather’ is worth that much in a recipe.  To use it in a recipe, tear it up in pieces and soak it in just under 2 cups of hot water, for probably 30 minutes or so.   Then use it just like fresh puree, in whatever recipe you have.  There are photos and more detailed information on the Zucchini Powder post.

For making the powdered squash: the latest batch, 5 cups of puree, became just 10 tablespoons after drying and powdering.  That means to make one cup of puree, use 2 Tbsp. powder along with just under 1 cup hot water.   Isn’t that amazing? Think of the space that saves!  Five cups, which would have taken up freezer space, now stores in the space of about 2/3 of a cup.  The pumpkin I dried requires 3 Tbsp. plus water to make a cup.  This pumpkin powder bakes up beautifully in pies and breads.

 
When I make vegetable powder, it usually sticks to itself in a big lump after storing a little while.  Normally I just whack it a couple times to break off what I need, or chop around in the jar with a butter knife.  This time something new occurred to me- sometimes a little cornstarch is added to powdered sugar to keep it from lumping.  It’s a good moisture absorber, so my most recent batch has a little cornstarch added to it.  So far, so good.  We’ll see in six months how it really works.  Just in case that quantity messes with my recipes, I wrote how much cornstarch is there, on the jar of powder.  In this case, it’s 1 Tbsp. cornstarch per 2 cups reconstituted puree.  It looks like maybe more than necessary, but so far nothing is sticking!


You can powder about anything- think what you ever use in a pureed form, and make that into vegetable powder.  Tomato powder is great, it can be used to replace tomato paste, tomato sauce,  or tomato juice, depending on how much powder you use with how much water.  Mushroom powder is nice for cream-of-mushroom soup, or for extra flavor in soups and stews, onion powder goes almost without saying, carrot powder is good, too, and beet powder is sneaky but awesome. Throw it in almost anything.  I mostly use it to color frosting, though, since one of my boys can’t have artificial colors without his eczema flaring. It’s also great way to use beets that stayed in the garden a little too long and became a bit woody.  Try this out, and see what you think!


           Foolproof Pancakes -for my size family, we triple this
Makes 10 3" pancakes        (You can also turn this recipe into Pumpkin Pancake mix.)

1   cup   flour   (white or whole wheat)
1   cup   buttermilk or sour milk   
1   tsp.   sugar   
1/2  tsp.   baking soda   
1/2  tsp.   salt   
1   egg   
2   Tbsp.   butter, melted, optional

Combine all and whisk lightly.  Cook on a greased or non-stick skillet,  on medium-high, using 1/4 cup batter per pancake.  Cook until bubbles form around outside edges, then flip and cook until other side is browned.

The original recipe called for 3/4 cup buttermilk and 1/4 cup whole milk, but what I've got above works great.
For blueberry pancakes, stir 3/4 cup of blueberries into batter. 
For banana pancakes, slice one banana into batter. 
Picture
Cook pancakes on high heat, either on a greased or nonstick surface.  When the bubbles around the edges stay 'popped' and the edges are not runny, flip the pancake.

Picture
Cook until the other side is golden as well.  The pancake will puff up when you first flip it, and then it will stop rising.  If you're not sure if it's done, poke one in the center.  It shouldn't be runny.  If you flip the pancakes a second time, they will deflate and be more dense and flat.

4 Comments

What can I do to receive more blessings from God? and recipe: 'Anything-Goes' Muffins

10/27/2010

0 Comments

 
Picture
(originally 8/27/10)
Here's a scripture for today: Malachi 3:10 “Bring ye all the
tithes into the storehouse, that there may be meat in mine house, and prove me now herewith, saith the Lord of hosts, if I will not open you the windows of heaven, and pour you out a blessing, that there shall not be room enough to receive it.”


Have you, like me, received so much that it’s hard to fit anything else into your house, budget, or calendar?  It occurred to me that, like Elder Oaks’ talk, “Good, Better, Best," that in order to prepare with what’s MOST important, I need to inventory, evaluate, organize, and voluntarily pass on what is not ‘Best’.  This makes a house of order and frees up more space, money, and time with which the Lord can bless me with what will do the most good. To become more self-reliant and prepare for life’s adversities.  Also see D&C 109:8-9.

Yes, it takes work.  But work is good.  Work is what God does.


Here’s a recipe put together by my friend Laura Smith.  The column on the left gives you the basic ingredients, the column on the right gives you more information about them (or substitutions for them), and below tells you how to make variations.  If you want plain muffins, and you have all the regular ingredients, just use the left column and ignore the rest.  If you have some raspberries that have gone soft, and a raspberry-chocolate muffin sounds like exactly what you'd like to munch on, you will be able to make it!   This batter is also good cooked in a loaf pan, you’ll just need to cook it longer.   For instance, make the basic recipe using  mashed bananas….  and there’s banana bread for you.  I highly recommend you print this out- maybe tape it to the inside of your cupboard.  The 'Anything-Goes' Muffin recipe
 (Google Doc)
0 Comments

How much does a year’s supply cost? and Best Drop Biscuits

10/26/2010

0 Comments

 
Picture
Once the dough is mixed, if you use a greased/sprayed 1/4 measuring cup to scoop the dough, you'll get a more traditionally-shaped biscuit.

Picture
Yum.  Tender and light on the inside, crunchy on the outside.  This batch was made with 1 cup whole wheat flour.

How much will your year’s supply cost you?  I just got an emergency supply store’s catalog in the mail; they advertised a year’s supply of food for ‘just’ $3649.95.  For one person.  Is it really that much money to get a year’s supply?

Adding up all the essentials, a month’s worth of food for one person is $16.23

                            A year’s worth for one person is  $194.76

Figure in that you’re getting your year’s supply after building your three-month supply; that knocks it down to getting nine months’worth;

                                                            $146.07 per adult.   

You CAN afford to get your home storage! 

If you really want to spend $3649.95 plus tax, you could buy a year’s supply for not just one person, but for NINETEEN people.  Yes, basic storage is different food than that ‘gourmet’ version, but here’s the counsel we’ve been given:          
"We encourage members world-wide to prepare for adversity in life by having a basic supply of food and water and some money in savings.” “For longer-term needs….gradually build a supply of food that will last a long time  and that you can use to stay alive” (fromAll is Safely Gathered In, First Presidency pamphlet)


Here is the cost breakdown:


Grains, 300 lbs- if you get just wheat and oats, at the cannery they cost between $5.80 and $8.15 for 25 lbs. depending on if you get white or red wheat, quick or regular oats.  If you average this out, it will cost you $6.98 per person, per month.  $83.70 per year’s worth.

Milk, 16 lbs is $1.40/lb at the cannery, which is $1.87 per month, $22.40 per year.

Sugar, 60 lbs is $ .56/lb there, $2.80 per month, $33.60 per year.

Oil, 10 qts –this isn’t sold at the cannery, but the price at Macey’s last week was $2.50 for 1 ½ quarts (48 oz.) At that price, after tax, it’s $1.43 per month, $17.17 per year.  It’s only $14.38 if you buy it at Sam’s Club ($6.98 + tax for 5 qts.)

Salt, 8 lbs- 4# box at Costco or Sam’s Club is a dollar; $ .16 per month, $2 per year.

Legumes, 60 lbs– the cannery sells black beans, pinto, and white, from $14.10 to $16.30 for 25 lbs.  Averaging the prices, it’s  $2.99 a month, $35.92 per year.

Water, 14/gal/person-   You can store this for free by using 2- and 3- liter pop bottles, or juice containers (not milk jugs- they break down).  Or use the 5-gallons square jugs or big blue barrels; they’ll run you about $1 per gallon of storage. 

When you’re done storing these items, you might decide to add a few ‘gourmet’ items- but that’s just extra stuff.

Notice that the costs were just for food, not containers to store them in. Most of my storage containers cost nothing.   You CAN get buckets for free, with a little effort- most bakeries give them away; all their frostings and fillings come in those buckets.  Plan on washing them at home.  There are two main sizes; 5 gallon and 2 1/2  gallon.  I keep packages of dried fruit in the smaller buckets, also cornmeal or other things that I don’t use as much.  They are a great size for a pantry, too.  Some of the buckets have gaskets, some don’t.  The ones that don’t seal well are still good for storing sugar. 

If you want all your wheat, powdered milk, sugar, and legumes in #10 cans from the cannery, it will cost you $85.83 more to get a full year’s worth, $65 to do 9 months' worth.

Here’s the year’s worth breakdown and quantities:    51 cans of wheat $137.80, 11 cans of beans $48.95, 10 cans of sugar $46.50, 4 cans of powdered milk $28.20.

 I don’t can my wheat, sugar, or beans because we go through large quantities; one batch of bread would use a whole can.  Pretty silly storage for me.  Besides, it’s easier for me to find space for 10 buckets than 60 #10 cans; they hold about  the same amount of food.


Best Drop Biscuits
 adapted from Cooks Country
Makes 12

 1 cube butter, melted and cooled a few minutes- set aside 1 Tbsp. of this.
1 cup cold buttermilk or sour milk  (1-2 Tbsp. vinegar in 1 cup regular milk)
2 c. flour
2 tsp. baking powder
½ tsp. baking soda
½  tsp. salt  (3/4 tsp. if you used unsalted butter)
1 tsp. sugar

 Heat oven to 475 degrees, no, that’s not a typo.  Mix together the butter (except reserved) and buttermilk; stir until the butter forms clumps.  (This is a faster way of getting the same results as ‘cutting in’ the butter.)  Mix all the dry ingredients together, then pour in buttermilk mixture.  Stir until just mixed in and dough pulls from side of bowl.   Drop onto  greased or parchment-lined cookie sheet.  A greased  ¼ c. measuring cup makes the perfect size scoop.    Brush with reserved butter.  Bake until tops are crisp and golden, about 12-14 minutes.    Serve warm.  These also reheat well the next day (10 minutes at 300 degrees) and freeze well, too.

You can use powdered milk in this: mix in 3 Tbsp dry milk powder when you’re stirring together the dry ingredients.  Use ice water  and 1-2 Tbsp. vinegar to make 1 cup, stir with the melted butter.

 
0 Comments

Cooking and storing pumpkins, root cellaring

10/16/2010

0 Comments

 
Picture
You can even store summer squash alongside your pumpkins, if the summer squash is very mature, with a hard rind.

Picture
A bowl of thick, tasty Pumpkin Chili.  Don't tell your kids, and they'll never know....
Want to know what nutrients you're getting with that pumpkin?  A whole cup of it has only 49 calories, but is loaded with fiber, Vitamin C, riboflavin, potassium, and lots and lots of Vitamin A.  For the numbers, see nutrition for cooked pumpkin puree.
For the facts on its seeds, which are a great source of protein, Omega-6's, magnesium, potassium, zinc, copper, and manganese, see nutrition for pumpkin seeds.

Hi everyone,

This week we had a pumpkin class at my house.  It was fun, and I think everyone learned at least one new thing.  I have two different ‘handouts’; one is the Pumpkin class handout, two pages from the class; the other is a big collection of recipes I started in college, The Great Pumpkin Cookbook  (If it won't load, get it in two parts, here: The Great Pumpkin Cookbook part 1 and The Great Pumpkin Cookbook part 2).  I had asked a roommate if I could have her jack-o-lantern after Halloween.  When I told her I was going to make pie out of it, she incredulously responded with, “You can do that?  How?”  So I started by typing up instructions, and one thing lead to another…    

The Great Pumpkin Cookbook includes information on cooking pumpkin, canning, dehydrating, freezing, and ‘root cellar’ing it, plus things like Pumpkin Cheesecake, Pumpkin Shake, and Pumpkin Pancakes.  

If you want to learn more about storing vegetables through the winter, with or without a ‘real’ root cellar, click on Storing Vegetables At Home, which is a chart and information from the Wisconsin Extension Office.  
 

Here’s something to chew on, from the LDS Family Home Storage pamphlet; italics are mine:

Dear Brothers and Sisters:

Our Heavenly Father created this beautiful earth, with all its abundance,
for our benefit and use. His purpose is to provide for our needs
as we walk in faith and obedience. He has lovingly commanded us to
“prepare every needful thing” (see D&C 109:8) so that, should adversity
come, we may care for ourselves and our neighbors and support bishops
as they care for others.
We encourage Church members worldwide to prepare for adversity
in life by having a basic supply of food and water and some money in savings.  

 
And another, related, quote:

“Can we see how critical self-reliance becomes when looked upon as the prerequisite to service, when we also know service is what godhood is all about? Without self-reliance one cannot exercise these innate desires to serve. How can we give if there is nothing there? Food for the hungry cannot come from empty shelves. Money to assist the needy cannot come from an empty purse. Support and understanding cannot come from the emotionally starved. Teaching cannot come from the unlearned. And most important of all, spiritual guidance cannot come from the spiritually weak.  President Heber J. Grant declared, “Nothing destroys the individuality of a man, a woman, or a child as much as the failure to be self-reliant.”  -The Celestial Nature of Self-Reliance, Marion G. Romney

 
I challenge you to expand your home storage efforts, to find some part of it to learn more about, to try for the first time (or try better for the second-- or tenth-- time), to do something that will help you become a little bit more self-reliant. The Lord doesn’t ask us to do everything, all at once, but he does ask us to be diligent.  (See Mosiah 4: 27)  I know our capacity and freedom will increase as we do this.

-Rhonda

Here's some great information I found at http://www.americanpreppersnetwork.net/viewtopic.php?f=122&t=2166
"Only fresh and sound produce should be root-cellared. The food should be free from cuts, cracks, bruises, insects and mechanical damage. When I prepare produce for winter storage, I inspect it carefully. Items with any damage are either eaten quickly or canned or frozen. Apples and pears can be made into sauce, squash roasted and frozen, and beets pickled.

Quantities for a family of four:

Apples: 5 bushels
Carrots: 40 to 60 pounds
Cabbage: green, 20 heads; red, 10 heads
Beets: 20 pounds
Celeriac: (celery root, use instead of celery) 10 to 20 heads
Leeks: 40 plants
Potatoes: 100 pounds or more
Jerusalem artichoke: 10 pounds
Onions: 40 pounds
Garlic: 10 to 20 pounds
Winter radish: 10
Parsnip: 20 pounds
Squash: 40 ‘Delicata’ and 30 pounds butternut
Pumpkin: 5 to 10
Turnip and rutabaga: 10 or more"
0 Comments

Earthquake shelves, quick soft breadsticks

10/6/2010

0 Comments

 
Picture
I found this method of securing jars, by accident, just trying to maximize my shelf space.  The metal shelves we bought have a wide lip, which normally means there is a 2" space between the top of your food and the bottom of the shelf up.  It turns out that the lip can be used to keep jars on the shelf. 

Picture
I have to tip the jar to get it in, and then it stays put!  About 3/4" of the top of the jar is hidden- and trapped- by the upper lip of the shelf.

Picture
Another option is to run rope, thick string, or bungee cords in front of the jars. Usually I just wrap the rope around the endposts of the shelf to secure each one, but do whatever works.  

Another thing to consider is keeping your shelves from tipping over.  You can buy an L-shaped metal bracket at Home Depot or Lowe's for a couple dollars, use a couple screws to secure one side of the L to the top of your shelf, the other side to the wall.  MAKE SURE IT'S SCREWED INTO A STUD! This works well for bookshelves, too, which is a good thing for people like me whose children often climb when I'm not looking.... 

Picture
This week's information is on earthquake preparedness. Have you read up on the local earthquake hazards?  I read a rather lengthy report on hazards in Utah, and just laughed at the section on earthquakes-  pretty much any scenario that might happen somewhere in the world, can happen here on the Wasatch fault.  Some of these things sounded wild- like the whole valley floor tipping and allowing Utah Lake to fill up most of the Salt Lake Valley, or liquefaction of soils (basically, the ground turns to quicksand during shaking, and tall buildings fall over on their sides).  There are 2 main types of "events", as they're called, and we're due for both of them.  For instance, one type (non-surface-faulting, if you want the name) happens every 300-400 years, and it's been 350 years since the last one.  If the LDS Church decided it was important enough to spend the money to retrofit the Tabernacle, and to build the Conference Center to far exceed earthquake building standards, don't you think it's worth doing the simple things at home you can?

Most injuries are from things falling, not from building collapse.  Plus, I don't know about you, but I'd sure hate to lose a summer's worth of canning because they rattled off their shelves.  Or to have my storage area full of broken glass, nevermind the food that had been in them.  There are some very simple, cheap things you can do to secure your food storage.  I don't know how they'd do in the worst-case-scenario earthquake, but it'd be better than nothing.  The pictures above show a couple options. 

The State of Utah recently published a booklet about planning for earthquakes, "Putting Down Roots in Earthquake Country".  It's full of good info. Pages 22-23 have more information about keeping your belongings from crashing all over during an earthquake. Here's the link:

http://ussc.utah.gov/publications/roots_earthquake_low.pdf     

 
And for those of you in my neighborhood who ever wondered if there was anything good about our dirt here, there is a silver lining to all that nasty rock in our yards- our soil here in Glenmoor (South Jordan), combined with the location, has the lowest chance of turning to quicksand (liquefaction).   We're also as far from a faultline as you can be in this valley.  (Which really isn't saying much, but every little bit helps!)

 
P.S.   Do you know what our schools' emergency plans are?  Where and when do you get your children if they're at school?    I called our elementary and  middle schools to find out, and the short answer is- stay home until THEY (the schools) contact YOU.  They'll go in lockdown if they need to, or stay outside in good weather, or in case of bad weather or a severely damaged school, the Glenmoor church building is the fallback for Welby; the Dunsinane building and/or Walmart (really!) is the one for Elk Ridge.  When things are safe, they'll allow the students to call home, or you'll get a message via the radio, TV, Internet, etc.

 
Now for the recipe....

Quick Soft Breadsticks

Ready in 20-30 min. Yield: 12 breadsticks

1 1/4 cups flour (measure this one by scooping, NOT by spooning it into the cup)
2 tsp. sugar
1 1/2 tsp. baking powder
1/2 tsp. salt
2/3 cup milk
3 Tbsp. butter melted
2 tsp. sesame seeds

Mix flour, sugar, baking powder and salt. Gradually add milk and stir to form a soft dough. Turn onto a floured surface; knead gently 3-4 times. Roll in a rectangle, 10"x5" and 1/2" thick. Cut into 12 breadsticks. (A pizza cutter works best for this.) Place butter in a 9x13 pan. Place breadsticks in butter and turn to coat. Sprinkle with sesame seeds. Bake at 450 14-18 minutes or til golden. Serve warm.    We double this for my family, and bake on a 12x18" cookie sheet.

This dough is very soft. If it's too sticky for you, use lots of flour on the counter when rolling, and be sure to cut with a pizza cutter!

 
0 Comments
<<Previous

    Need a Search bar?
    One day I may upgrade my website-- but until then, use your web browser search bar. Type in my web address and what you're looking for, like this-- 
    www.theprovidenthomemaker.com  pumpkin --  and you should get results.


    Author

    I'm a disciple of Christ, a member of the Church of Jesus Christ of Latter-day Saints, a family-defending, homemaking, and homeschooling mom of eight children, two of whom sometimes can't have milk or wheat. Growing up on a farm in a high mountain valley, my parents taught me to 'make do', work hard, smile, and help others.  I love cooking, learning, growing food and flowers, picking tomatoes, and making gingerbread houses --which CAN be made allergy-friendly-- with my children.  I hope you find something to help you on my site!

    Archives

    April 2024
    July 2023
    April 2022
    September 2021
    March 2021
    December 2020
    April 2020
    March 2020
    February 2020
    January 2020
    December 2019
    November 2019
    October 2019
    September 2019
    August 2019
    July 2019
    June 2019
    May 2019
    April 2019
    January 2016
    November 2015
    October 2015
    September 2015
    March 2015
    February 2015
    November 2014
    October 2014
    September 2014
    August 2014
    July 2014
    June 2014
    May 2014
    April 2014
    March 2014
    February 2014
    January 2014
    December 2013
    November 2013
    October 2013
    September 2013
    August 2013
    July 2013
    June 2013
    May 2013
    April 2013
    March 2013
    February 2013
    January 2013
    December 2012
    November 2012
    October 2012
    September 2012
    August 2012
    July 2012
    June 2012
    May 2012
    April 2012
    March 2012
    February 2012
    January 2012
    December 2011
    November 2011
    October 2011
    September 2011
    August 2011
    July 2011
    June 2011
    May 2011
    April 2011
    March 2011
    February 2011
    January 2011
    December 2010
    November 2010
    October 2010
    September 2010

    Categories

    All
    Alcohol
    Alternate Cooking
    Appearances
    Apple
    Apricots
    April Fools
    Aprons
    Bananas
    Beans
    Beef
    Beets
    Bench
    Beverages
    Bonnet
    Bread
    Breakfast
    Budget
    Budgeting
    Cake
    Candy
    Canning
    Carrots
    Cheese
    Chicken
    Children
    Chocolate
    Christmas
    Cleaning
    Coconut
    Comfrey
    Common Core
    Constitution
    Cookbook
    Cookies
    Cooking Oil
    Crafts
    Dairy Substitutions
    Dehydrating
    Dessert
    Dried Fruit
    Earth Oven
    Earthquake
    Easter
    Edible Weeds
    Eggs
    Emergency Prep
    Essential Oils
    Faith
    Family Home Evening
    Fertilizing
    Food Storage
    Fourth Of July
    Freezer
    Frosting
    Fudge
    Garden
    Gardening
    Gingerbread
    Gluten
    Gluten Free
    Gold
    Government
    Grains
    Gratitude
    Hat
    Herbs
    Home Remedies
    Home Repairs
    Homeschool
    Home Storage
    Honey
    Hope
    Inflation
    Leftovers
    Legumes
    Lemon
    Main Dishes
    Mixes
    Mothers
    Noah
    Non Artificial Colors
    Non-artificial Colors
    Nuts
    Oats
    Oil
    Orange
    Paint
    Peaches
    Pear
    Pie
    Pizza
    Plums
    Poem
    Popcorn
    Pork
    Potatoes
    Powdered Milk
    Prayer
    Preparedness
    Projects
    Prophecy
    Pruning
    Pumpkin
    Quick Bread
    Rhubarb
    Rice
    Salad
    Salt
    Sauces
    Self Reliance
    Self-reliance
    Sewing
    Shelf Life
    Shelves
    Sky
    Smoothie
    Snacks
    Soup
    Spices Or Seasonings
    Squash
    Strawberries
    Substitutions
    Sugar
    Summer Fun
    Three Month Supply
    Time
    Tomatoes
    Trees
    Truffles
    T-shirts
    Tuna
    Ultra Gel
    Valentine\'s Day
    Vegetables
    Water
    Watermelon
    Wheat
    Work
    Year Supply
    Zucchini

    RSS Feed

Web Hosting by iPage